
If you’ve been building Laravel apps for a while, you’ve probably hit that point where your authorization logic starts getting out of hand. You start with one or two role checks, and before you know it, your controllers are full of scattered if statements and your middleware is doing things it probably shouldn’t. Managing Laravel roles and permissions manually is one of those things that feels fine at the start — until it really doesn’t. That’s exactly the problem spatie/laravel-permission was built to solve, and honestly, once you use it, you won’t want to go back.
The Problem with Manual Role & Permission Handling
Let’s be real — most of us have written something like this at some point:
if ($user->role == 'admin') {
    // allow access
}It works. For a while. But then your app grows. You add more roles. You realize “admin” means different things in different contexts. You need an editor who can publish but not delete, a moderator who can hide comments but not ban users, and a super admin who can do everything. Suddenly your codebase looks like a mess of nested if statements and hardcoded strings.
Here’s what makes this approach painful in real projects:
- It doesn’t scale. Adding a new role means hunting through your entire codebase.
- It’s hard to maintain. One typo (
'Admin'vs'admin') and you’ve got a silent bug. - It’s messy in large teams. Everyone starts handling it differently, and consistency goes out the window.
- No audit trail. You can’t easily see who has what role or permission from a central place.
There’s a better way.
What is spatie/laravel-permission?
spatie/laravel-permission is a Laravel package by Spatie that gives you a clean, database-driven system for managing roles and permissions. It’s one of the most downloaded Laravel packages on Packagist for a good reason — it just works, and it fits naturally into how Laravel already thinks about authorization.
Here’s what you get out of the box:
- Role management — create, assign, and revoke roles
- Permission assignment — attach specific permissions to roles or directly to users
- Middleware support — protect routes based on roles or permissions
- Clean API — intuitive methods like
assignRole(),givePermissionTo(),hasRole(), andcan() - Multiple guard support — works with web and API guards
It stores everything in your database, so you can manage access control dynamically without touching your code every time something changes.
Installation & Basic Setup
Getting started is straightforward. First, pull in the package via Composer:
composer require spatie/laravel-permissionNext, publish the config file and migration:
php artisan vendor:publish --provider="Spatie\Permission\PermissionServiceProvider"
php artisan migrateThis creates four tables in your database: roles, permissions, model_has_roles, and model_has_permissions. Clean and simple.
Now, add the HasRoles trait to your User model:
use Spatie\Permission\Traits\HasRoles;

class User extends Authenticatable
{
    use HasRoles;

    // ...
}That’s it for setup. Seriously, you’re already ready to start creating roles and permissions.
Pro Tip: If you’re using multiple guards (like for an API), make sure to check the config/permission.php file. The guard_name option controls which guard the roles and permissions are tied to.
Creating Roles & Permissions
Now for the fun part. You can create roles and permissions anywhere — in a seeder (which is usually the best approach), in a controller, or in a console command.
use Spatie\Permission\Models\Role;
use Spatie\Permission\Models\Permission;

// Create roles
Role::create(['name' => 'admin']);
Role::create(['name' => 'editor']);
Role::create(['name' => 'viewer']);

// Create permissions
Permission::create(['name' => 'edit articles']);
Permission::create(['name' => 'delete articles']);
Permission::create(['name' => 'publish articles']);
Permission::create(['name' => 'view articles']);You can also assign permissions directly to roles:
$adminRole = Role::findByName('admin');
$adminRole->givePermissionTo(['edit articles', 'delete articles', 'publish articles', 'view articles']);

$editorRole = Role::findByName('editor');
$editorRole->givePermissionTo(['edit articles', 'publish articles', 'view articles']);Pro Tip: Use a DatabaseSeeder to seed your roles and permissions. It makes it easy to reset them across environments and keeps everything version-controlled.
Assigning Roles & Permissions
Once your roles and permissions exist, assigning them to users is just a method call:
// Assign a role
$user->assignRole('admin');

// Assign multiple roles at once
$user->assignRole(['editor', 'viewer']);

// Give a specific permission directly to a user (bypassing roles)
$user->givePermissionTo('edit articles');

// Remove a role
$user->removeRole('editor');

// Sync roles (removes all existing, assigns new ones)
$user->syncRoles(['admin']);The sync methods are especially handy in admin panels where you want to update a user’s roles from a form.
Checking Laravel Roles and Permissions
This is where the package really shines in your day-to-day code. Checking if a user has a role or permission is dead simple:
// Check role
$user->hasRole('admin');
$user->hasAnyRole(['admin', 'editor']);
$user->hasAllRoles(['admin', 'editor']);

// Check permission
$user->can('edit articles');
$user->hasPermissionTo('edit articles');

// Check permission via role (indirect)
$user->hasRole('editor'); // editor has 'edit articles' permissionYou can also use these checks in Blade templates:
@role('admin')
    <a href="/admin/dashboard">Admin Panel</a>
@endrole

@can('edit articles')
    <button>Edit</button>
@endcanThat @role and @can directive support means your views stay clean too. No PHP logic bleeding into your templates.
Using Middleware for Laravel Roles and Permissions
Protecting routes is where things get really practical. The package ships with middleware you can use directly on your routes:
// Protect by role
Route::group(['middleware' => ['role:admin']], function () {
    Route::get('/admin/dashboard', [AdminController::class, 'index']);
    Route::get('/admin/users', [AdminController::class, 'users']);
});

// Protect by permission
Route::group(['middleware' => ['permission:edit articles']], function () {
    Route::get('/articles/{id}/edit', [ArticleController::class, 'edit']);
});

// Combine role and permission check
Route::get('/publish', [ArticleController::class, 'publish'])
->middleware(['role:admin|editor', 'permission:publish articles']);The | separator acts as an OR — the user only needs to match one of the listed roles. Clean, readable, and easy to audit.
Pro Tip: Register the middleware in your app/Http/Kernel.php if you’re on Laravel 10 or earlier. In Laravel 11+, the package handles this automatically.
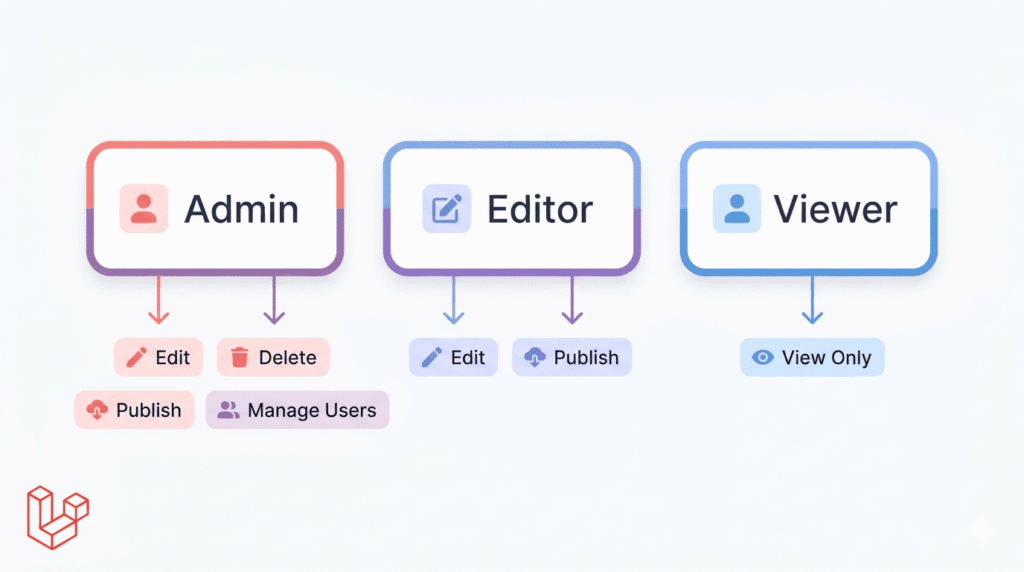
Example: Blog System
Let’s put it all together with a real scenario — a blog application with three types of users.
Roles & permissions breakdown:
| Role | Permissions |
|---|---|
| Admin | edit articles, delete articles, publish articles, manage users |
| Editor | edit articles, publish articles |
| Viewer | view articles |
Seeder:
public function run()
{
    // Create permissions
    $permissions = [
        'view articles',
        'edit articles',
        'delete articles',
        'publish articles',
        'manage users',
    ];

    foreach ($permissions as $permission) {
        Permission::create(['name' => $permission]);
    }

    // Create roles and assign permissions
    Role::create(['name' => 'admin'])->givePermissionTo(Permission::all());
    Role::create(['name' => 'editor'])->givePermissionTo(['edit articles', 'publish articles', 'view articles']);
    Role::create(['name' => 'viewer'])->givePermissionTo('view articles');
}Routes:
Route::middleware(['auth'])->group(function () {
    Route::middleware('role:admin')->prefix('admin')->group(function () {
        Route::resource('users', UserController::class);
    });

    Route::middleware('permission:edit articles')->group(function () {
        Route::get('/articles/{id}/edit', [ArticleController::class, 'edit']);
        Route::put('/articles/{id}', [ArticleController::class, 'update']);
    });

    Route::middleware('permission:delete articles')->group(function () {
        Route::delete('/articles/{id}', [ArticleController::class, 'destroy']);
    });
});That’s a complete, scalable authorization system in about 30 lines. Try doing that cleanly with manual role checks.
Why It Saves Hours on Real Projects
Here’s an honest comparison. Without this package, you might:
- Write custom
rolecolumns on the users table - Build your own middleware
- Scatter permission checks through controllers
- Forget to update checks when requirements change
With spatie/laravel-permission, you get:
- Clean code — authorization logic lives in one predictable place
- Scalability — adding a new role or permission is a one-liner
- Reusability — the same system works across every Laravel project
- Fewer bugs — no more typo-prone string comparisons spread across files
- Better collaboration — your teammates immediately understand the pattern
It’s one of those packages that pays for itself on day one of a real project.
Common Mistakes to Avoid
1. Forgetting to run migrations
After installing the package, if you skip php artisan migrate, you’ll get database errors about missing tables. Always migrate right after publishing the config.
2. Not clearing the cache
The package caches roles and permissions for performance. If you update them directly in the database (or via seeders), run this to avoid stale data:
php artisan permission:cache-reset3. Confusing roles with permissions
Roles are groups. Permissions are the actual actions. Don’t create a permission called admin — that’s a role. Keep them semantically correct: permissions describe actions (edit articles), roles describe identities (editor).
4. Assigning permissions directly to users too often
It’s tempting to give individual permissions to specific users, but it makes your system harder to reason about. Stick to role-based permissions where possible, and only use direct permissions for genuine edge cases.
Managing Laravel roles and permissions doesn’t have to be painful. spatie/laravel-permission turns what used to be a tangled mess of hardcoded checks into a clean, scalable, and maintainable system — one that actually makes sense when you come back to it six months later.
Whether you’re building a small blog, a SaaS dashboard, or a complex multi-tenant app, this package fits in naturally and handles the heavy lifting for you. It’s well-maintained, extensively documented, and has a huge community behind it.
If you’re starting a new Laravel project and it has any kind of user roles involved — and most projects do — add this package from day one. You’ll thank yourself later.
Found this useful? Share it with your team or bookmark it for your next Laravel project.
Leave a Reply